Note: this post references the propane system in my second build. There is a list to all the parts and materials at the bottom of this post. You can read more about my latest build, Miles Van Camper v3 or check out all the parts I used here.
Important disclaimer: propane is explosive and therefore very dangerous! This blog post describes how I went about installing a propane system in my van only. For your safety, you should do your own research when installing a propane system and be sure to have the results inspected for safety by a qualified professional before using it. You can read codes for propane systems in RVs here.
There are many ways to add a propane tank to your van build. The simplest approach is to use the the disposable, 1-gallon cylinders which are inexpensive and can be purchased in many places. Others use a small tank that can be refilled such as this 5-gallon capacity tank. These are most often installed in a box inside the van. These storage boxes must be fully sealed and have a vent on the bottom that flows through the floor of the van so that if there are leaks, the propane gas – which sinks because it’s heavier than air – can escape.
In my first few builds, I chose to use an RV-style “Horizontal” tank that is ASME-certified and permanently mounted underneath the van. I purchased this replacement tank for Volkwagen Eurovan Winnebago campers that were built between 1995 and 2001 from GoWesty. It’s a 5.9 gallon capacity tank manufactured by Manchester Tank but really only holds about 4.6 gallons. Propane tanks are normally only filled to 80% of their capacity. These horizontal tanks use a special “fill valve” and a “bleeder valve” that is designed to let liquid propane come out when the tank gets to 80% full and signal to the person filling the tank that they should stop filling.
There are many of these types of tanks available for RVs but I chose this particular replacement tank because the round tank area is only 8″ in diameter compared to all the other tanks I could find that are 10″ or larger in diameter. This size is important because, even at the smaller size, the tank barely fits where I placed it which is just in front of the rear axle underneath the van. There is an nice opening there that isn’t close to any of the exhaust lines and didn’t interfere with my grey water tank and plumbing which is also located underneath the van on the passenger side.
Advantages
- Since the tank is designed to be mounted underneath the vehicle, any high-pressure leaks are outside the van. All three of the Volkswagen camper vans I owned had these external, horizontal tanks and they always worked great and have been proven safe from years of use in these VW campers and tons of standard RVs.
- By being outside, it didn’t take up any interior space in my floor plan.
- This tank includes a fairly accurate gauge that you can “see” (if you crawl up to it under the van) but also connects up to my SeeLevel II tank monitoring system. The other tanks I considered did not have any gauge and the available gauges didn’t have any interface to a centralized tank monitoring system.
- Despite its location tucked under the van, with the remote fill kit that I added, this tank can be easily filled at any propane filling station without needing to be removed or moved.
Start By Wrestling It Into Place
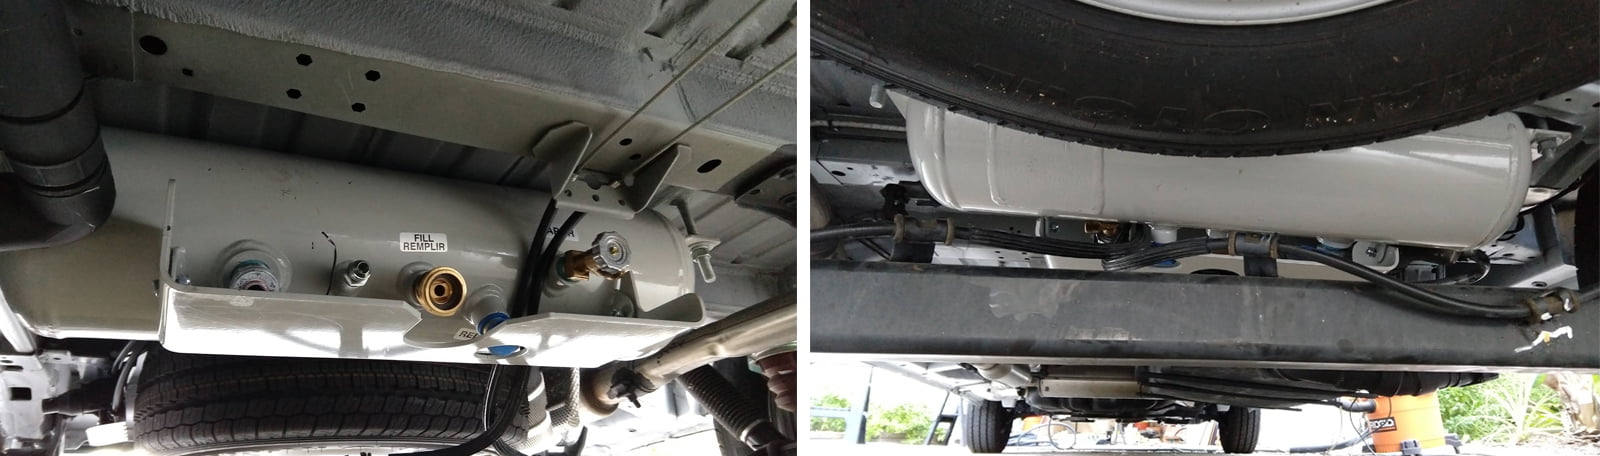
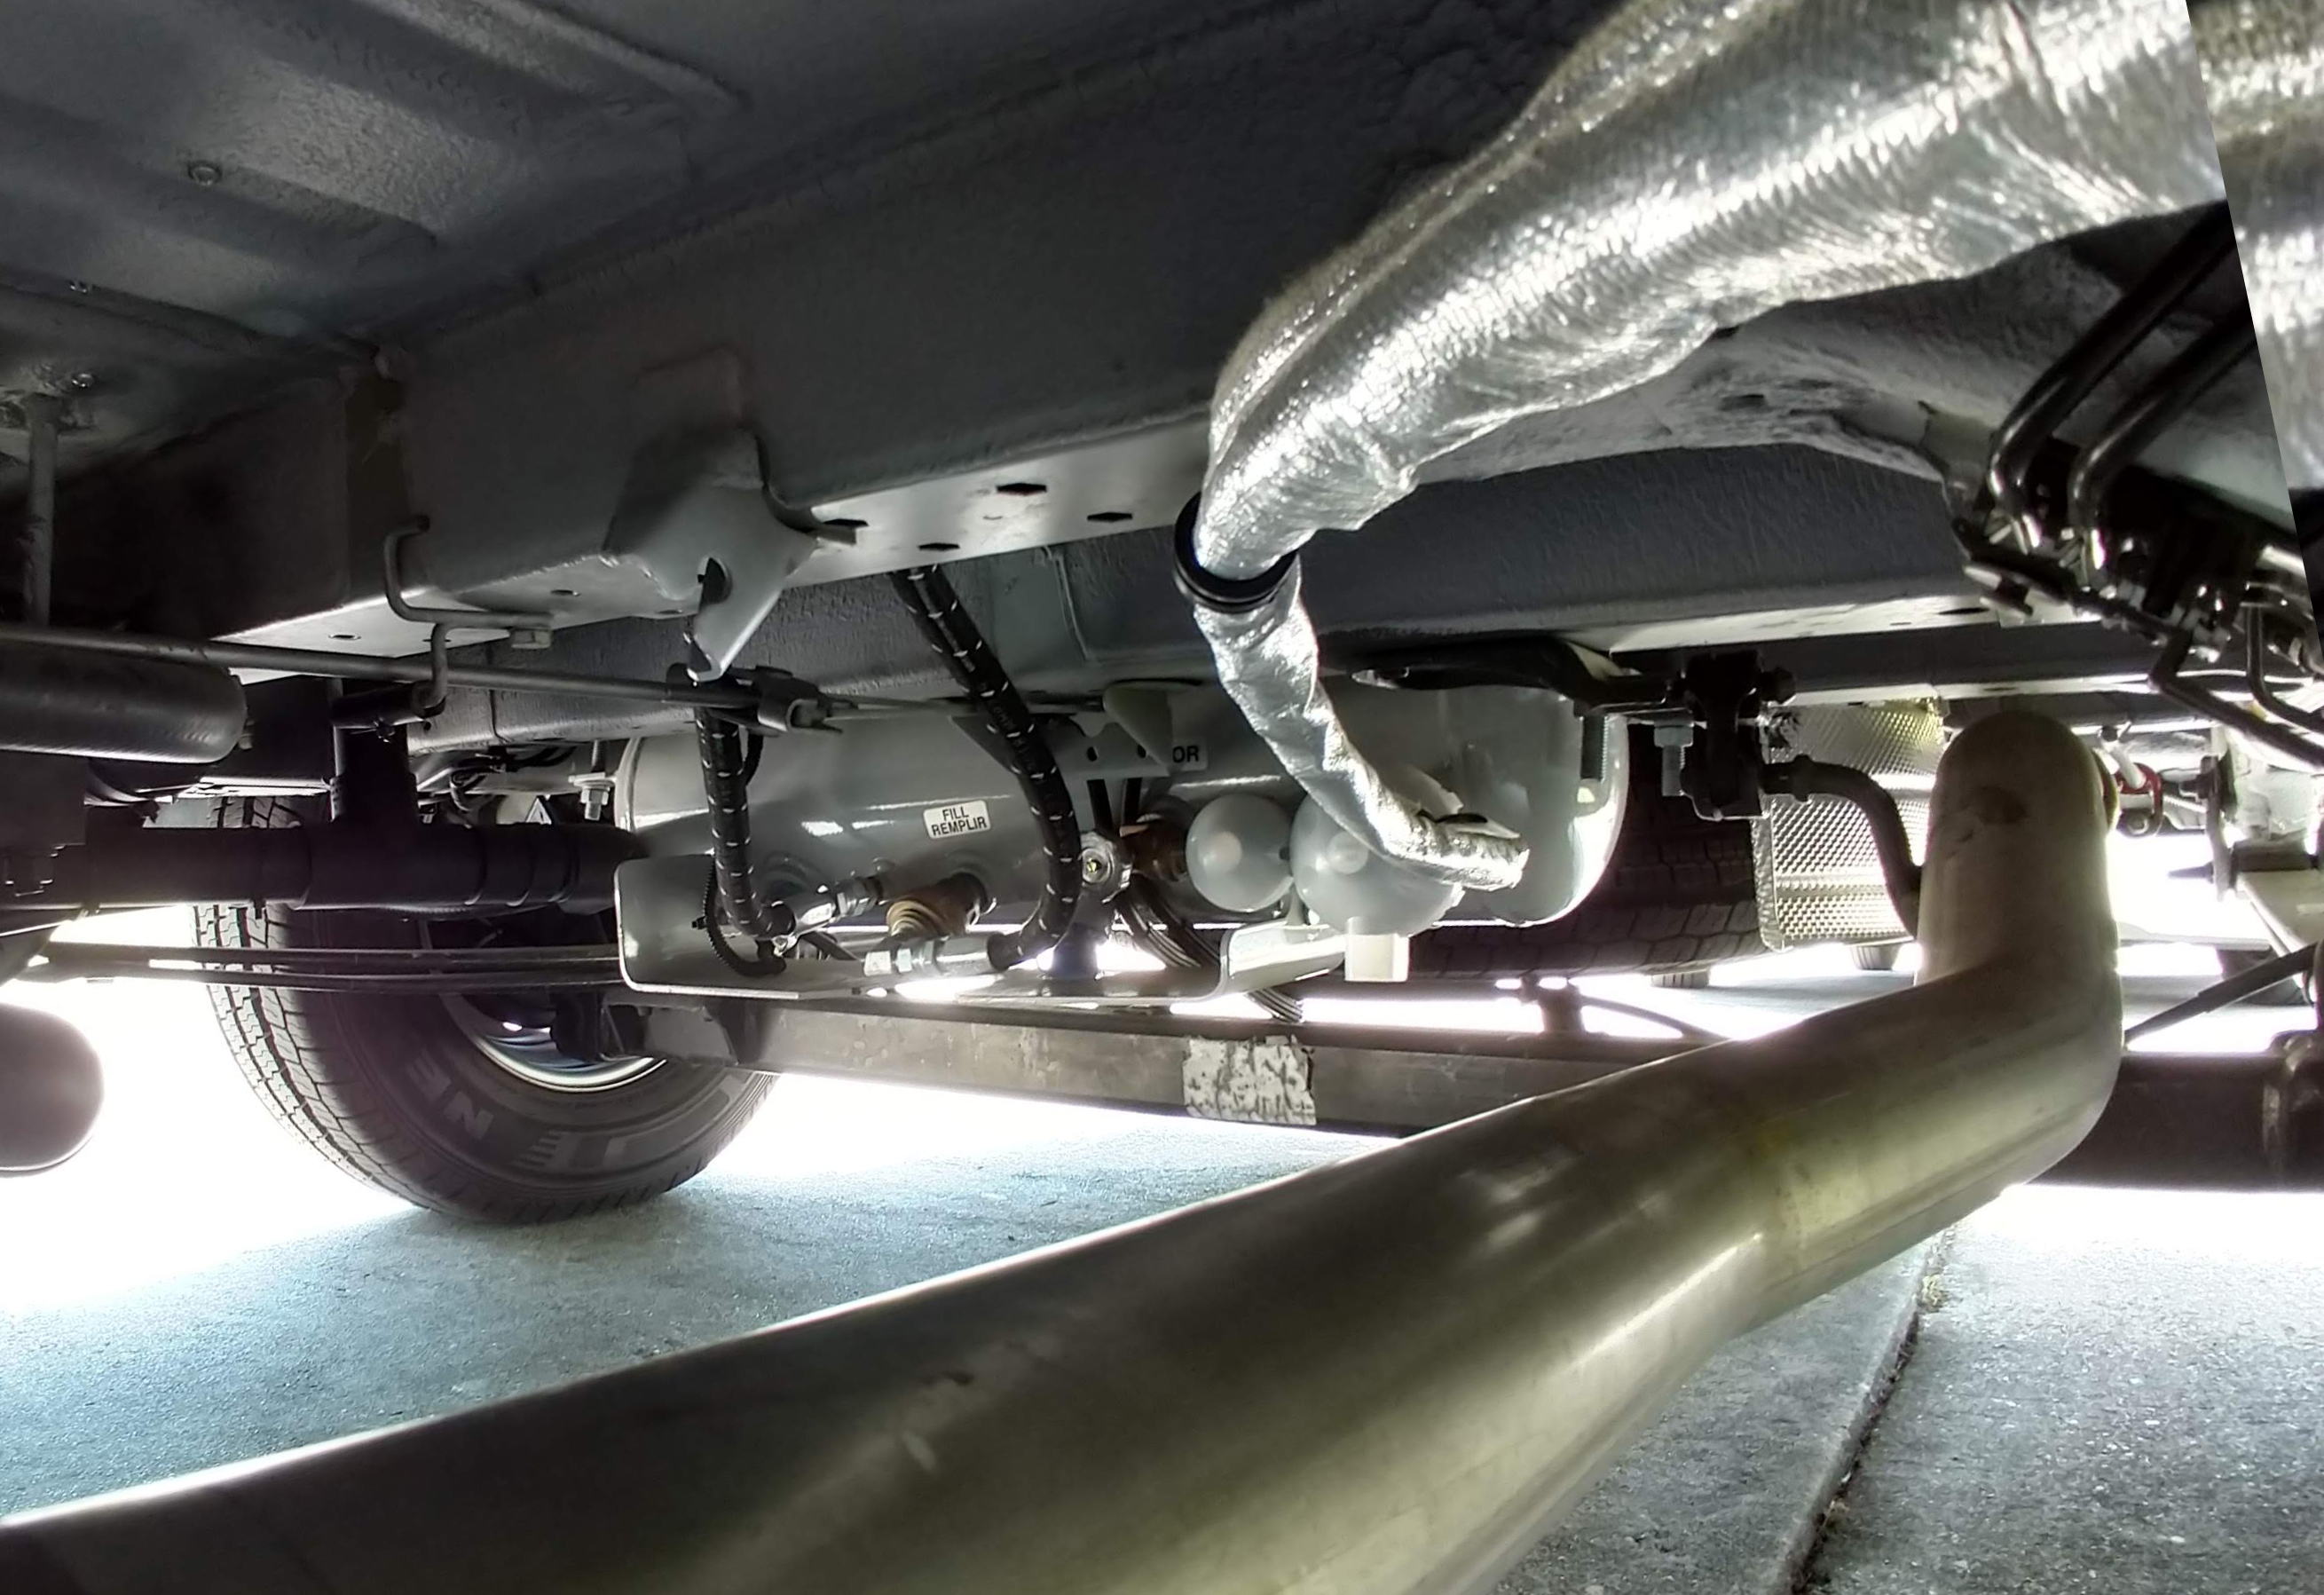
The first step was to wrestle this thing into place. Not only is it a tight fit in that cavity under the van but the emergency brake cables are also in the way. I used a jack, blocks of wood and plenty of colorful language getting up there. Then, I marked the the locations for the bolts. There are mounting brackets on both sides of the tank itself. I bolted it into place with heavy-duty galvanized bolts (through the van floor), locking washers and nuts. Below you can see the tank mounted in this location from the front and the rear.
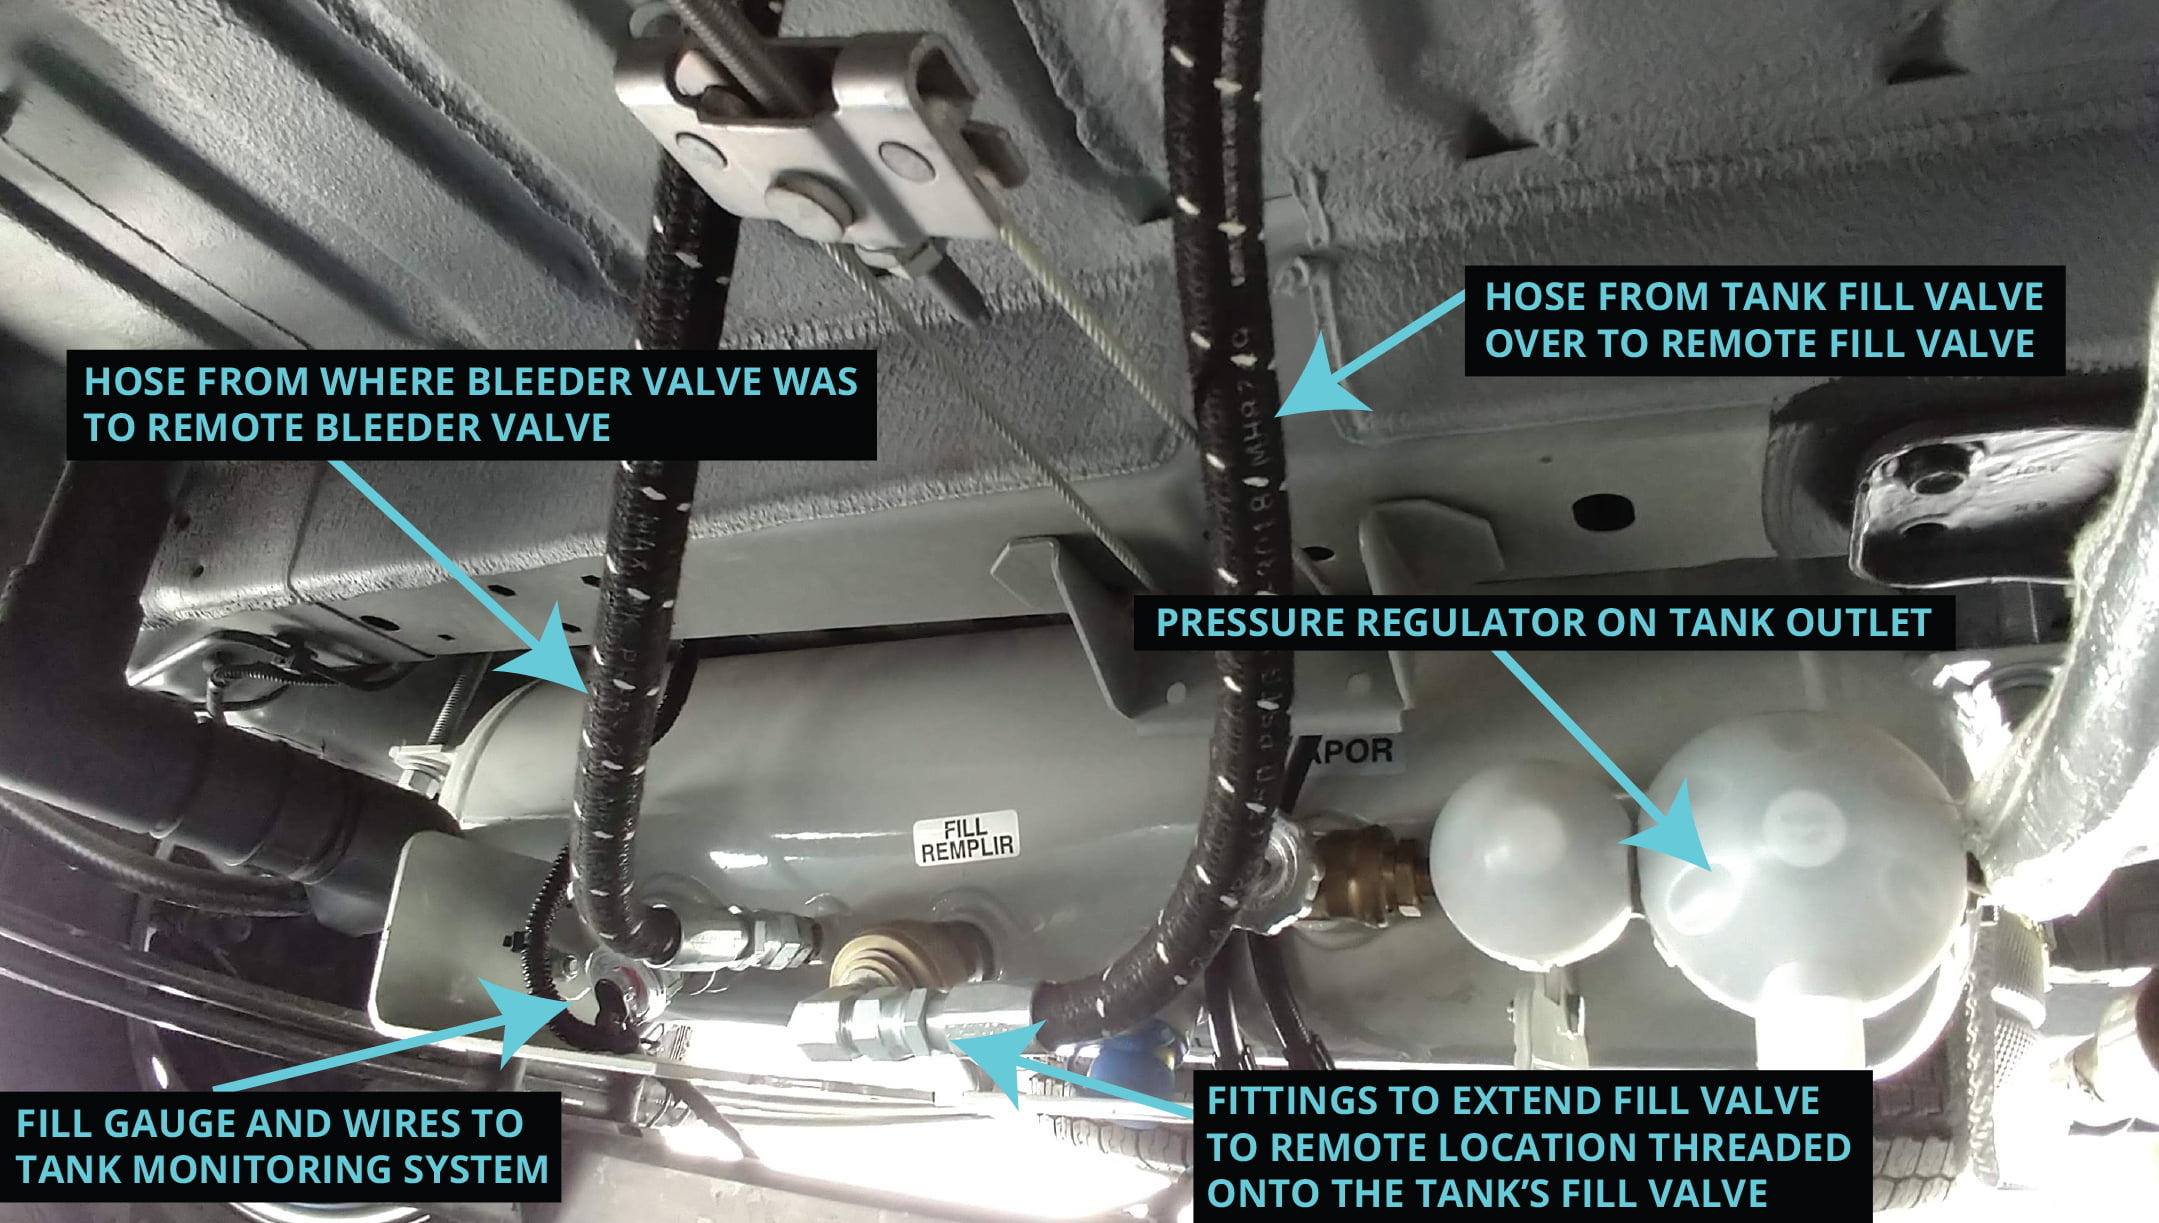
Next, I moved onto installing the Nashfuel Remote Fill Kit. This kit replicates the “fill valve” and “bleeder valve” built into the tank itself to a remote location. Often these types of tanks are located on the side of a vehicle van (such as on Volkswagen campers) or inside a compartment on the side of a RV which means that the propane filling station can access the tank, and these valves directly. In my case the remote fill was necessary since nobody is going to crawl under my van to fill the propane tank! The kit comes with all the fittings you need as well as 6 foot long lengths of high-quality hose for the fill and bleeder valve extensions. Essentially you’re using these two hoses (and the various fittings) to extend the valves on the tank to where you want to mount the remote fill.
The first step of the installation was to attach the provided fittings to the remote mounting bracket. This kit comes unassembled. In the illustration below you’ll see that on the “back” side of the mounting bracket you need two fittings/adapters to screw into the threads on the bracket itself. This gets you two 1/2″ male flare connections on that “back” side for the hoses. On the “front” side of the bracket you attach the remote fill valve and remote bleeder valve into the threads of the bracket. I used Permatex 80631 Thread Sealant with PTFE to seal all the threads. Honestly, getting all these fittings onto the bracket tightly was the most difficult part of the remote fill kit installation process.
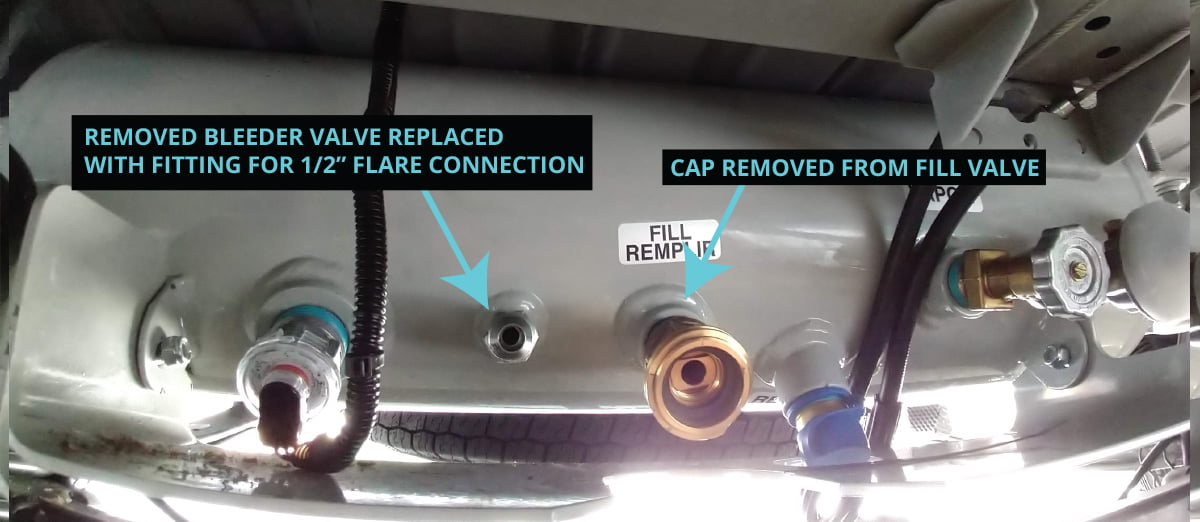
Next I had to remove the bleeder valve from the propane tank itself and replace that with an adapter that also has a 1/2″ male flare fitting for the hose that will connect this to the remote bleeder valve. Then I took the plastic cap off the tank’s fill valve and attached up a few fittings from the kit that allow the tank’s fill valve to be connected to the remote fill valve using the second supplied hose.
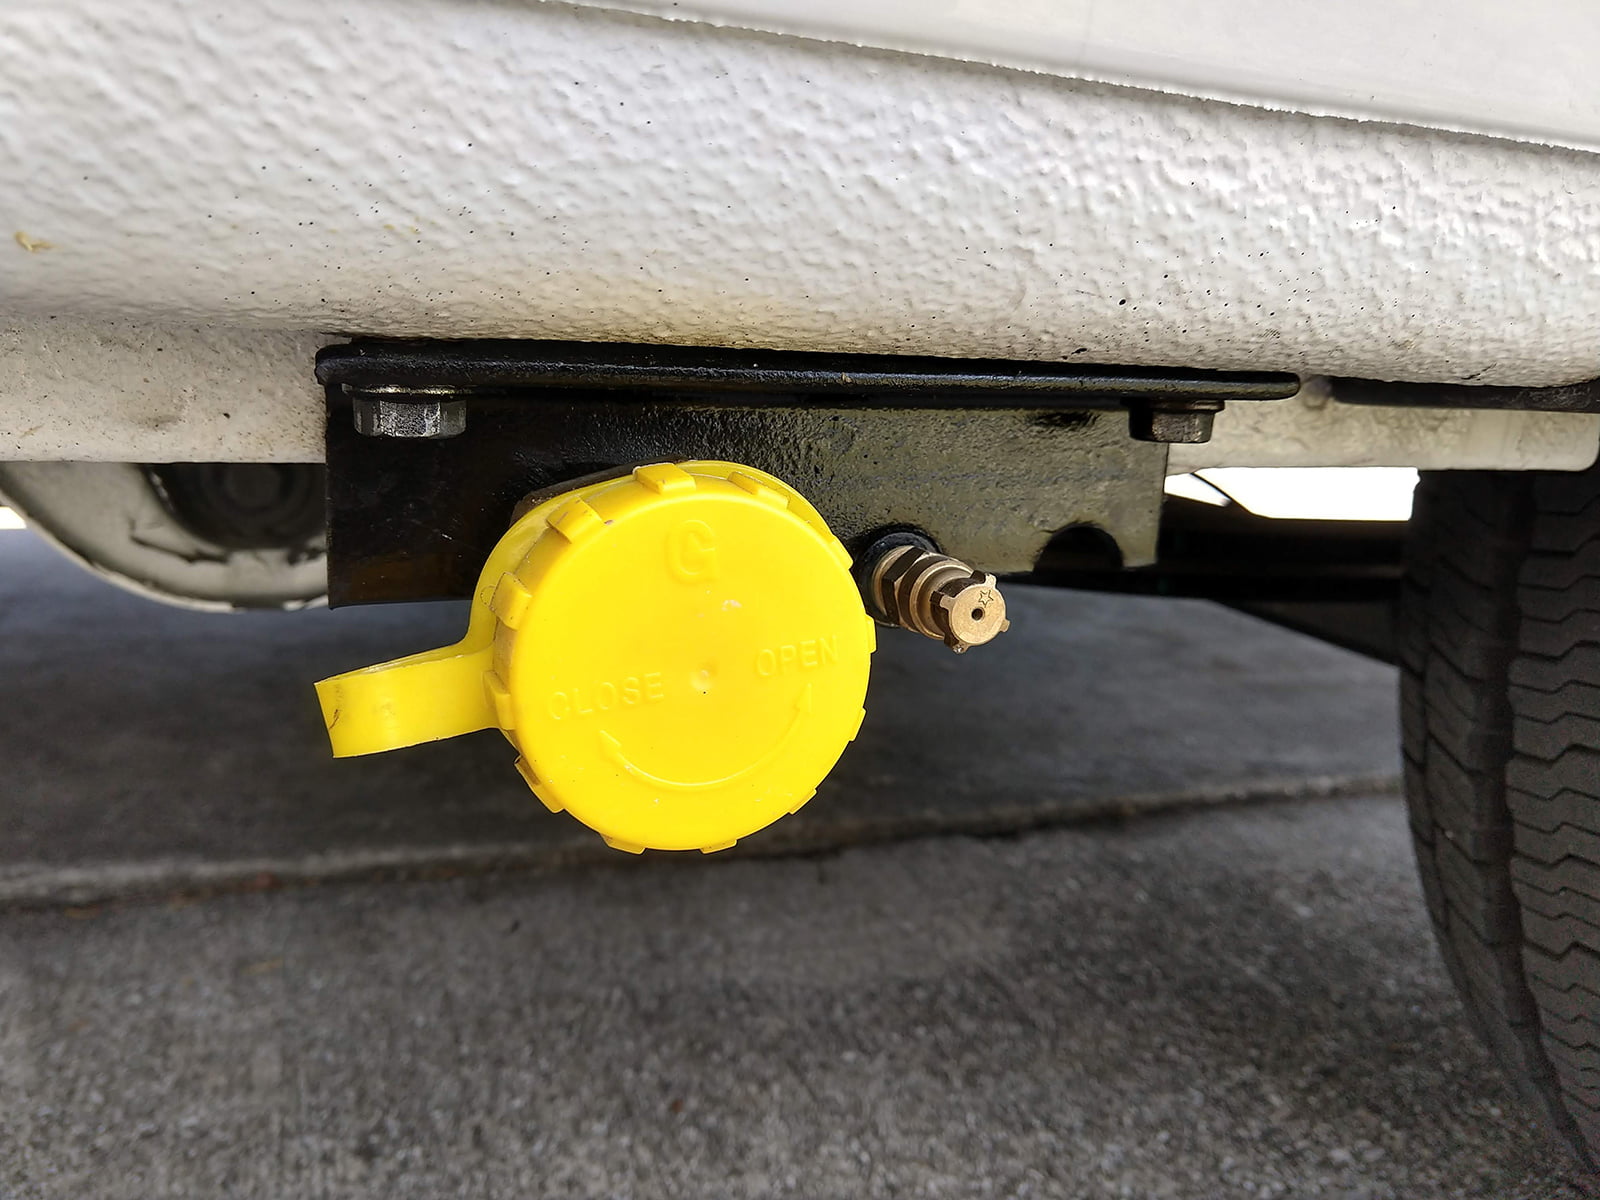
At this point it was time to mount the remote fill bracket. I installed it directly below the fresh water fill and shore power electrical connection on the passenger side of the van at the very bottom of the van wall using rivnuts and two bolts through the provided mounting holes. The paint quality on the metal bracket was poor so I just spray painted it with Black Rust-Oleum.
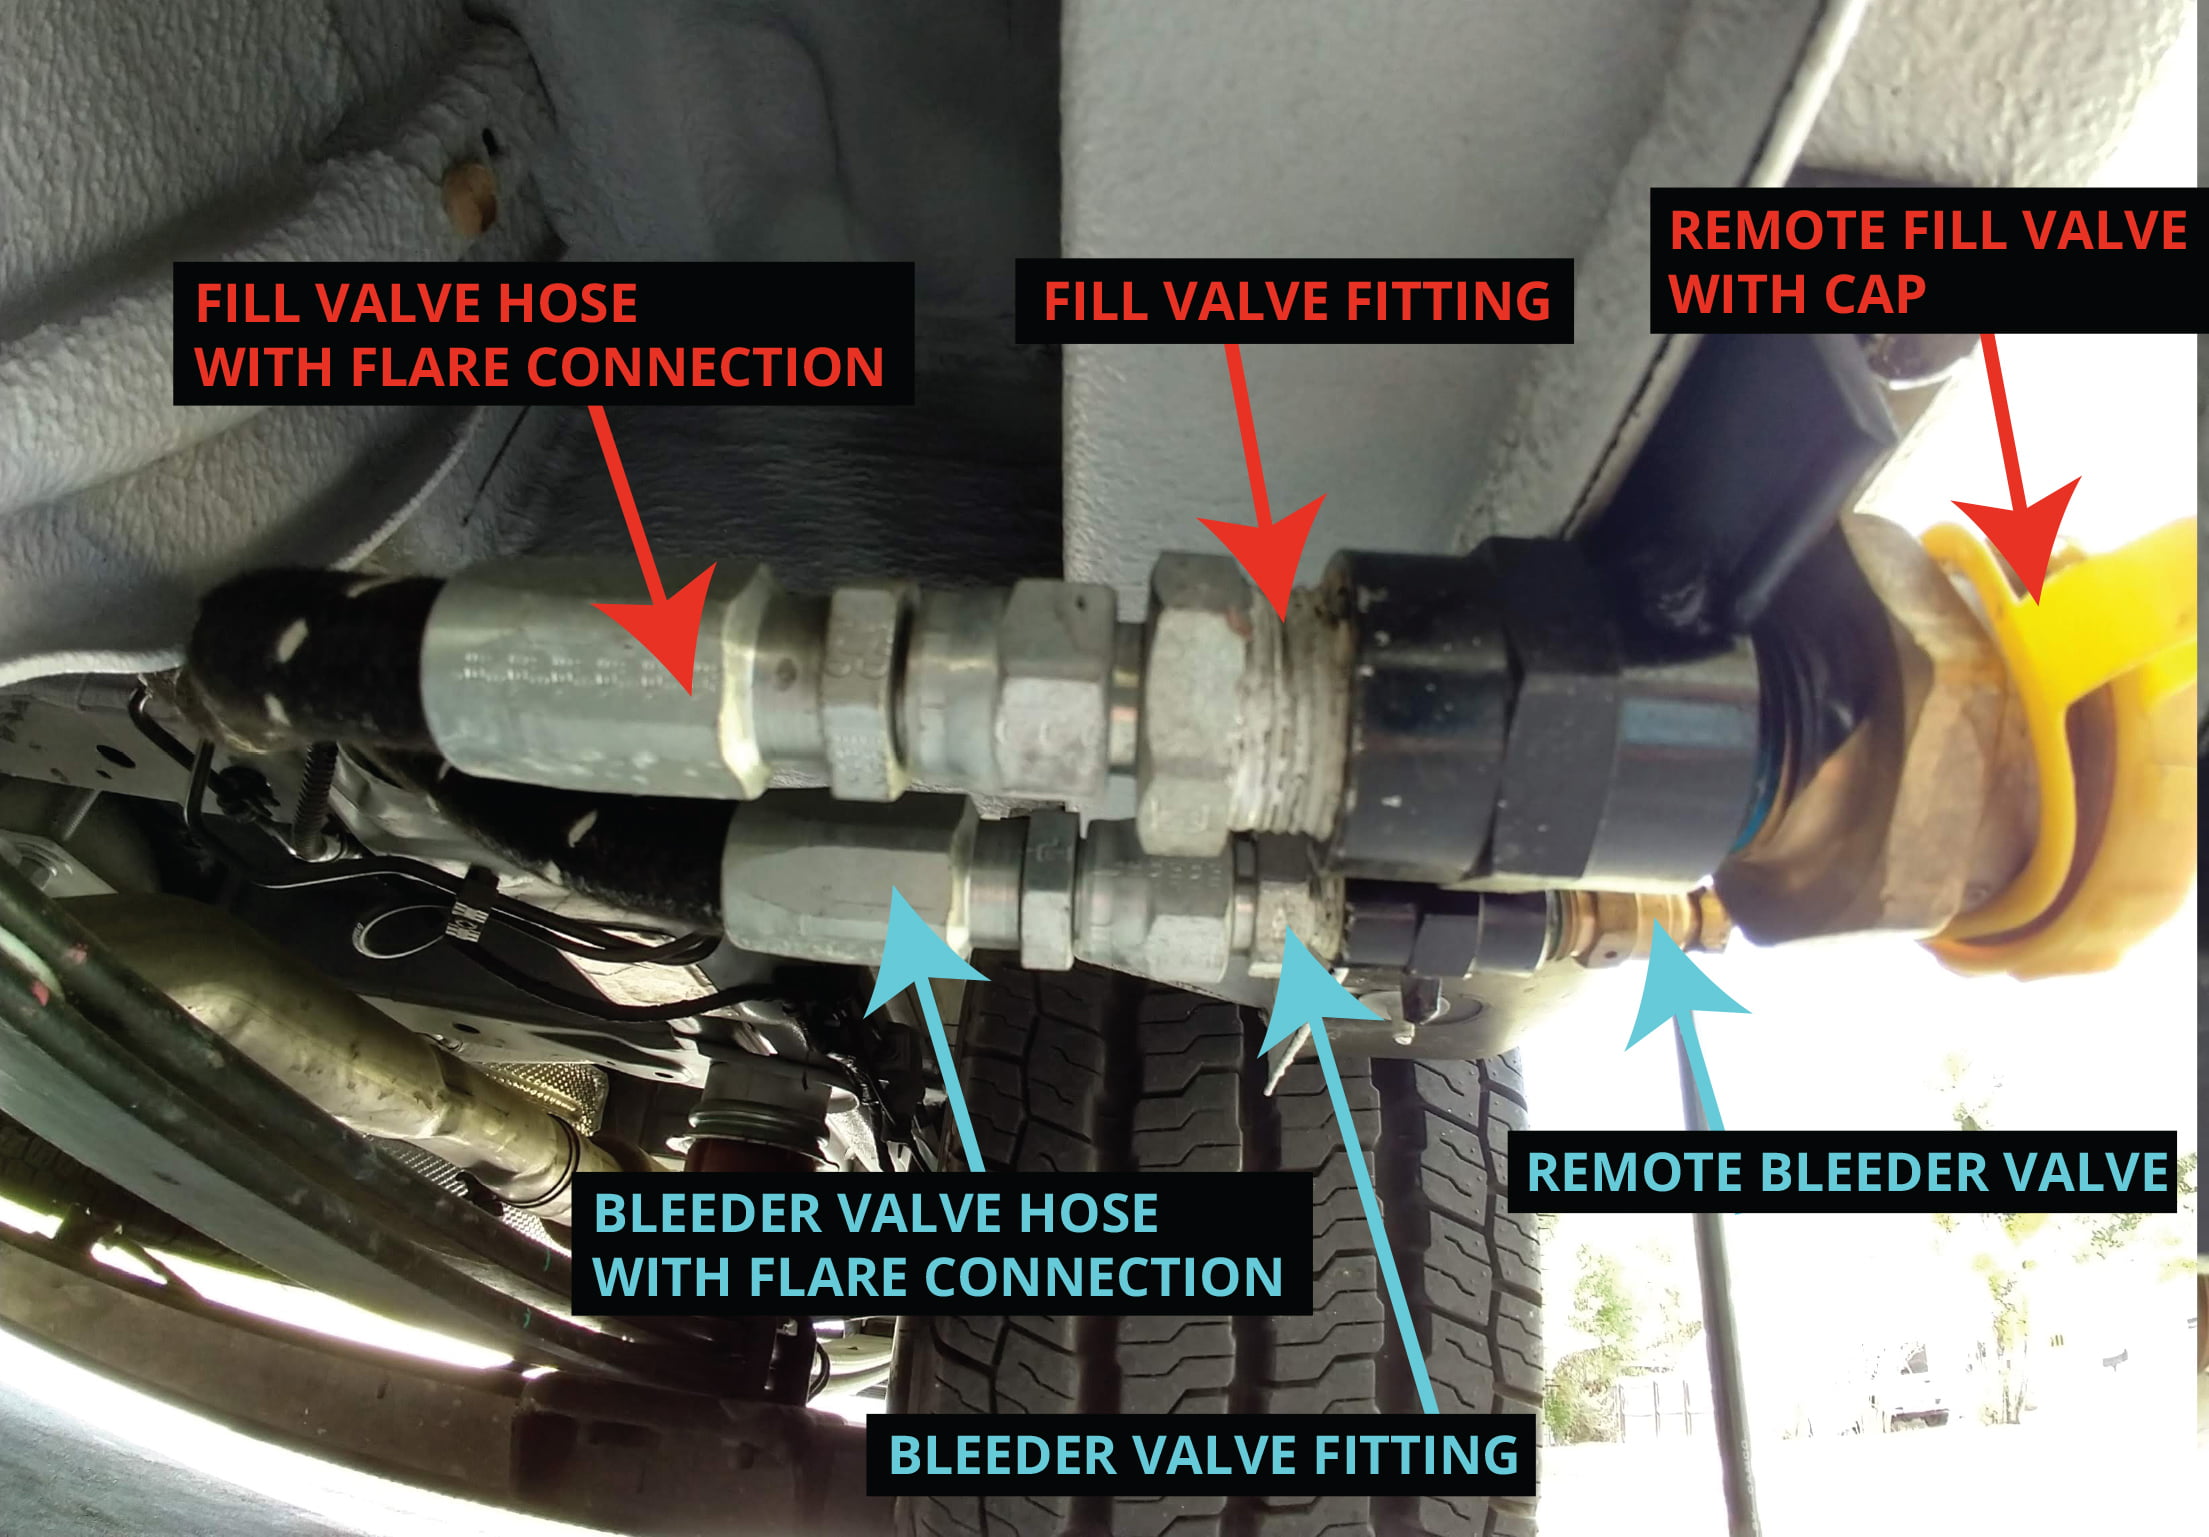
With all the fittings in place, I needed to cut the provided hoses to the correct length and add the flare connectors to hook up the remote valves to the tank itself. This particular kit came with 6′ lengths of hose for both the fill valve and bleeder valve but you can order longer lengths of hose if necessary. The process for installing the flare connections to the hose is pretty well detailed in the kit’s documentation. It was a new experience for me since I have never used that type of connector system. Basically you place part of the fitting into the hose itself and then there is another piece that sort of threads onto this to compress the hose to the fitting. It took me a while to wrap my head around the process but, after completing the first one, the remaining 3x went very fast.
Next I connected these hoses from from the tank’s fill and bleeder valve to the same valves on the remote bracket. This was refreshingly simple!
To wrap things up I installed this pressure regulator on the outlet of the tank itself. Like most propane appliances, my two devices (Propex heater and cooktop) require pressure-regulated gas. The regulator screws into the tank outlet and I used a 90 degree elbow 3/8″ male NPT to 3/8″ male flare fitting on the regulator’s outlet. From there I used a variety of Marshall 3/8″ flare supply hoses to connect the propane up to the actual appliances. There is only a few feet of this supply line outside the van before it goes up into the van (through a protected PVC sleeve). That exposed section, below the van is protected with a heat shield that protects it from the heat of the exhaust pipes of the van and also protects the hose from rocks and debris.
Filling Up The Tank
The last step was to fill up the tank! It’s pretty easy to find propane filling stations with Google. I’m always a little bit nervous when I first fill up a brand-new tank/propane system but everything went well. The bleeder valve indicated the tank was full at exactly 4.6 gallons as expected and I drove over to a remote section of the parking lot to check for leaks with a spray bottle of water and dish soap and, of course, my nose. Overall the installation was sound but I did find a very small leak at one of the fittings on the “rear” side of the remote fill bracket that was resolved with a bit of wrenching.
Parts & Materials
| Manchester Tank 5.9 Gallon Capacity | This is a replacement tank used on VW Eurovan Campers from 1995-2001. It has a smaller diameter than the other RV style Manchester tanks (8″ versus 10″) which is essential for where I located it underneath the van – just in front of the rear axle. It was quite difficult to wrestle it into that spot and I had to sort of bend the emergency brake cables out of the way but it did fit and is nice and tucked away without affecting the van ground clearance at all. By putting the tank in this location you need a remote fill kit like the one listed below. Since you can’t fill propane tanks up completely, it really only holds 4.6 gallons. |
| Nashfuel Remote Propane Fill Kit with Mounting Bracket | Because my propane tank is installed deep underneath the van I needed this “remote fill kit” to be able to fill the tank from the side of the van. The panel is mounted at the bottom of the van body on the drivers side (that side has the water fill and shore power inlets as well). I found it difficult to install this and test for leaks but it does work well and the kit comes with all the parts you need. |
| Manchester Tank G12846 LP Gas Tank Remote 90° OHM Sender | This thing is installed onto the tank (above) and sends the tank level to my SeeLevel tank monitoring system. Super handy! |
| Mr. Heater Two Stage Regulator | Does the job… I like that this one comes with a plastic cover. |
| Dual Carbon Monoxide and LP Gas Detector/Alarm | Great to have this two-in-one unit. It’s installed just front of the galley above the “step/heater cover”. Propane gas “sinks” so you want to install any LP gas detector low to the ground. |